Our students often get confused when they first learn about levels. After all, they just want to brighten their photos, so wouldn’t it be easier to remember the brightness/contrast button? Seriously, what do levels mean anyway? If levels essentially do the same thing, brighten images, then why bother? Well, it’s all about the visuals.
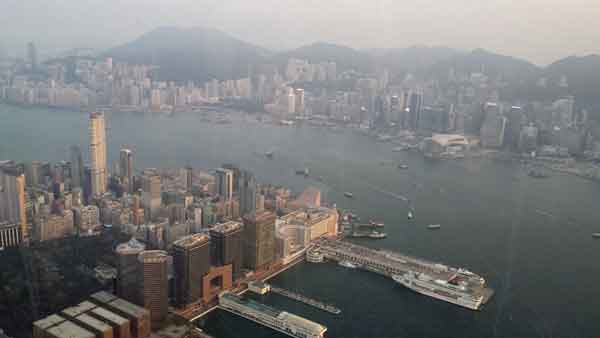
Let’s start with Deb’s favorite view of Hong Kong. It is a great view, but the image is rather dull. Hong Kong tends to get hazier as the day goes on. And since Deb rarely gets to the world’s highest bar at the Ritz Carlton before lunch, her photos can usually use a little adjusting. Here’s the original:
The photo is a bit washed out. There are no very dark (black blacks) or very light (white whites) colors in the image. Here’s a graph of the number of pixels at each of 256 values.
Black pixels are above the black triangle and white pixels are above the white triangle. The higher the line, the more pixels at that value. As you can see, there are no black pixels and no, or very few, white pixels (note the very short black line at the white triangle). Usually the best photos will have some black and some white pixels. We like to see this graph before we start fiddling with the photo.
How can you view this graph? Click on Adjustment Layers (the two-toned circle) in the Layers Panel. (Press F11 in Photoshop Elements or F7 in Photoshop, if you don’t see the Layers Panel.) Kris fondly calls this icon the “Amerikaner” after her favorite German cookie. (Why this German cookie is called the American will take an entire blog entry itself.) Then click on Levels.
![]()
When the Levels adjustment layer dialog box opens, you see the graph along with a bunch of sliders. Disregard the Output Levels slider. First try to move the black triangle to the left edge of the pixels and the white triangle to the right edge of the pixels. Then you can adjust the contrast by sliding the gray triangle to a pleasing look. If you want, you can try moving the black and white triangles again to see if the photo looks better.
![]()
Once Deb played around with the Levels adjustment layer, she came up with this gorgeous view of Hong Kong. Compare this to the original. Much better!
Here’s a quick comparison:
![]()
To get back our original question, you can adjust the photo with the Brightness/Contrast adjustment layer, but there’s no useful graph, so you just have to slide the slider buttons back and forth. If you change one of the sliders, you probably have to change the other. Back and forth, back and forth.
In the “olden days” (pre Photoshop CS3, and sometime before Photoshop Elements 9) the brightness/contrast adjustment would actually adjust all parts of the image equally, which was absolutely the wrong thing to do. Now you have a choice, but we still prefer the Levels adjustment. After all, we’re visual people, and the Levels adjustment graph provides visual clues to the adjustments your photo needs. By the way, if you only want to adjust the sky, that’s a different lesson!
Learn how to brighten your images and more by enrolling in one of our online Photoshop Elements classes. Click here to learn about our classes.

